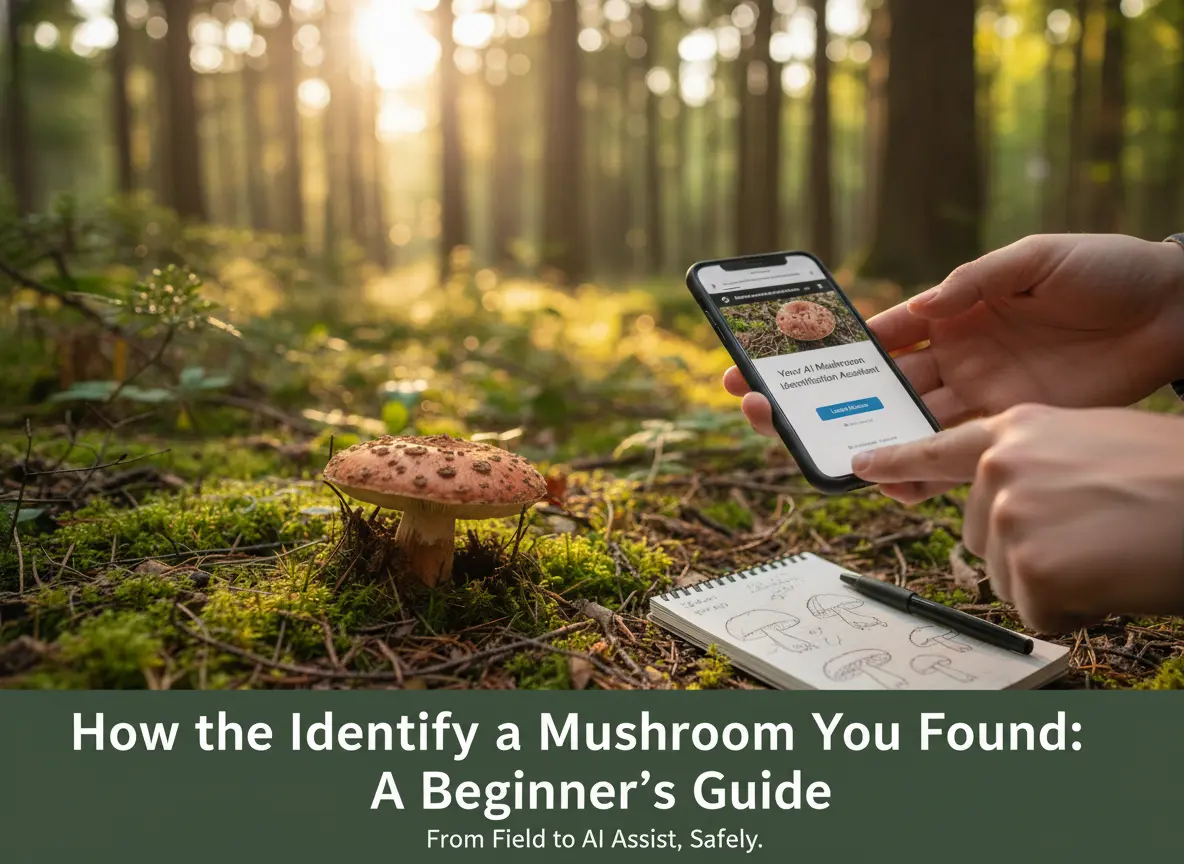

Every walk through a park, a hedgerow or a woodland edge takes you past mushrooms you have never looked at properly. Learning how to identify mushrooms changes that. It trains your eye, teaches you to read a landscape, and turns a routine walk into something closer to a treasure hunt.
It is also a skill with real stakes. A handful of the most elegant mushrooms in the world are deadly, and some of them look almost identical to species people cook and eat. So read the next section twice before you use anything else on this page.
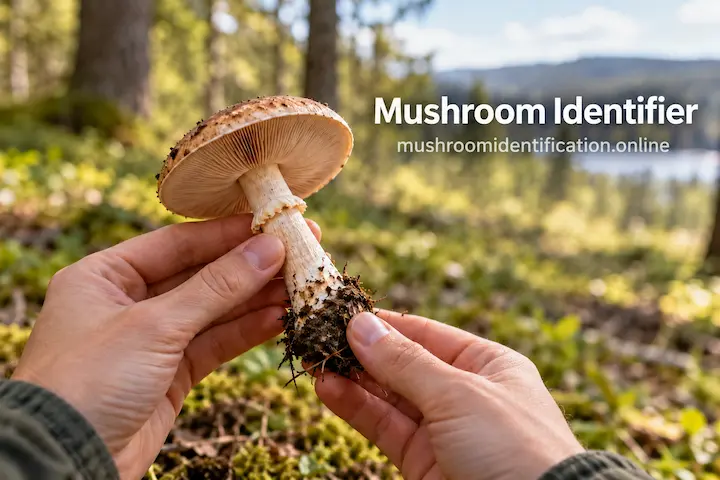 The cap gets your attention, but the features underneath it usually decide the identification.
Safety First: The One Rule That Matters
Never eat a mushroom because a photo, an app, or a web page told you it was edible.
Mushroom identification from a single image is an educated guess, not a confirmation. Colors wash out, the most important features sit underground, and a species can vary dramatically across its range. Even experienced mycologists treat photographs as a starting point, not an answer.
Two more rules follow from it:
- Do not taste-test. "Nibble and spit" is a technique for trained specialists working with material they already know. It is not a beginner's shortcut, and it is never necessary.
- Keep specimens away from children and pets while you work. A discarded stem on a kitchen counter is still a hazard.
If someone does swallow a wild mushroom, contact your regional poison control center immediately and keep the whole specimen — including the base — for identification. In the United States, Poison Control can be reached at 1-800-222-1222.
⚠️ This guide teaches you how to look, not what to eat. Identification from photographs alone is never a green light.
What You Need Before You Start
You do not need a laboratory. A small kit is enough:
- A basket or paper bag — never plastic, which makes mushrooms sweat and rot
- A sharp knife
- A small hand trowel, for lifting specimens out of the soil
- A notebook and pencil, or your phone's notes app
- Two sheets of paper — one white, one dark — for spore prints
- A camera or phone with a working macro mode
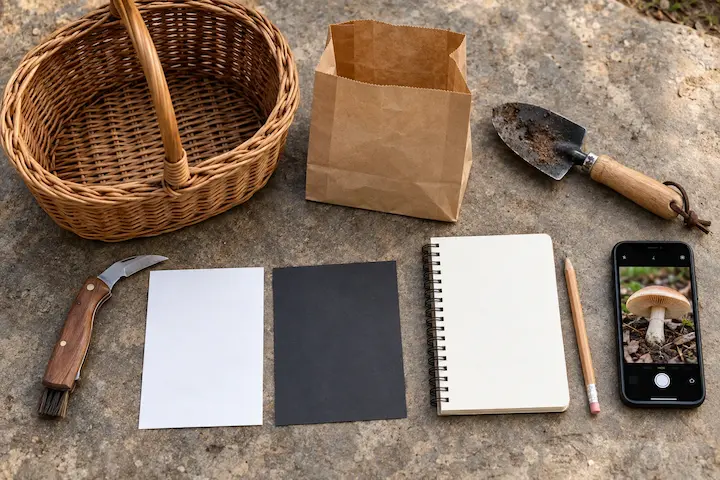 Everything you need fits in one basket. The dark sheet of paper matters as much as the white one.
One habit matters more than any tool: work on one mushroom at a time, and write everything down before you move on. Fresh specimens change color, dry out and lose their smell within hours.
Step 1 — Start With the Cap
The cap — the technical term is pileus — gives you your first set of clues. Note:
- Shape — round and convex, flat, funnel-shaped, conical, or umbonate (with a raised central bump)
- Size — width in centimeters, which is far more useful than "big" or "small"
- Color — and whether it is uniform or zoned
- Surface — smooth, felted, scaly, slimy, sticky, or powdery
- Edge — straight, rolled under, wavy, or lined with fine grooves
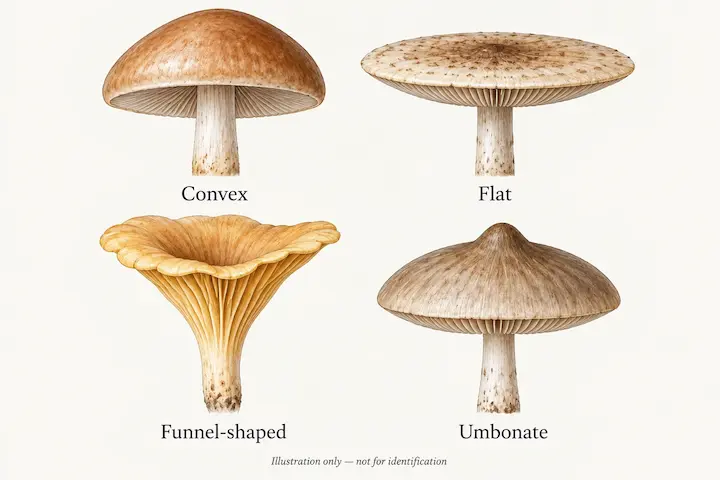 Four cap profiles side by side. Shape narrows the field before you have turned anything over.
Wet weather changes almost everything on this list. Photograph the cap while it is still dry if you can.
Step 2 — Check the Underside: Gills, Pores or Teeth
Turn the mushroom over. The structure under the cap is one of the fastest ways to narrow down what you are holding:
- Gills (lamellae) — thin, blade-like plates radiating from the stem. Typical of agarics, including most Amanita species.
- Pores — a sponge-like layer of tiny holes, found in boletes and many bracket fungi.
- Teeth — small, downward-hanging spines. Hedgehog mushrooms are the classic example.
- Ridges — blunt, forking folds that look like gills but are not. Chanterelles have these.
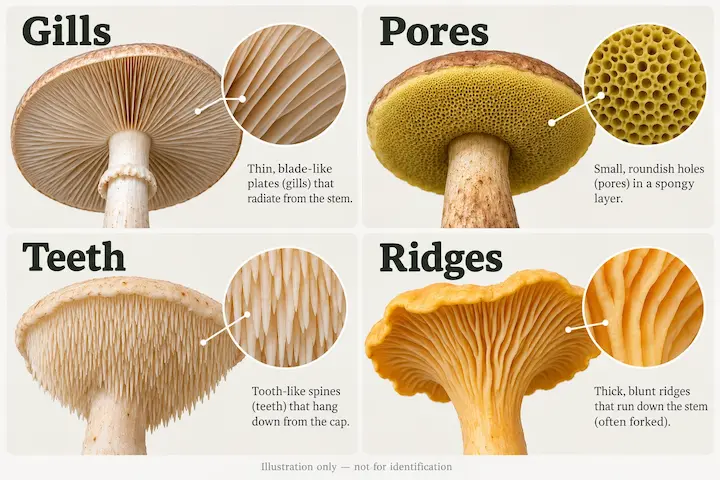 Gills, pores, teeth, ridges — the underside tells you which family you are in.
Then look closer at the gills themselves, if you have them:
- Attachment — do they reach the stem, stop short of it, or run down it?
- Spacing — crowded or widely spaced?
- Color — white, cream, yellow, pink, brown, black, or purple-brown?
That color matters a great deal, because it usually predicts the spore print in Step 4.
Step 3 — Examine the Whole Stem, Including the Base
Most beginners photograph the cap and ignore the stem. That is the single most common reason an identification fails. Look at:
- Shape — cylindrical, club-shaped, bulbous at the base, or tapering
- Texture — smooth, fibrous, shaggy, or with a net-like pattern
- Internal structure — cut it lengthwise. Is it solid, hollow, or stuffed with pith?
- Ring (annulus) — a skirt-like collar on the upper stem. Some species always have one, some never do, and some lose it as they age.
- Volva — a cup or sac at the very base. This is the critical one.
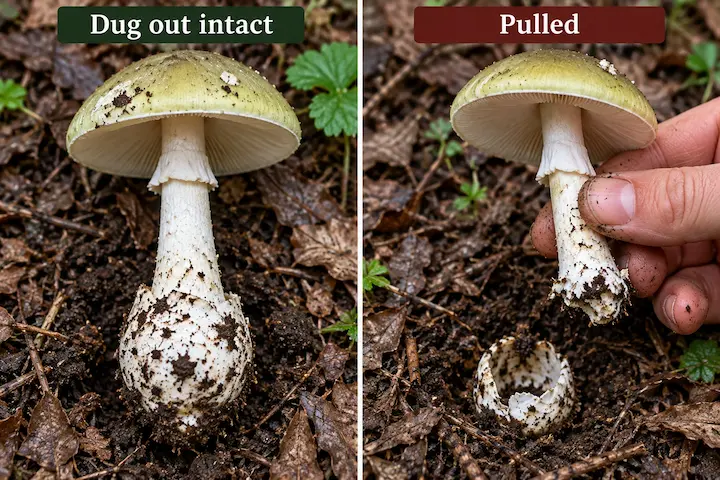 Same mushroom, two techniques. Dig it out (left) and the volva comes with it. Pull it (right) and the most important feature stays in the ground.
Now dig rather than pull. The volva of Amanita species — the group containing several of the world's most dangerous mushrooms, including the death cap and the destroying angels — often sits below the soil surface. If you pull a mushroom up by the stem, the volva stays in the ground and you lose the most important safety feature on the specimen. Use a trowel and lift the whole thing out.
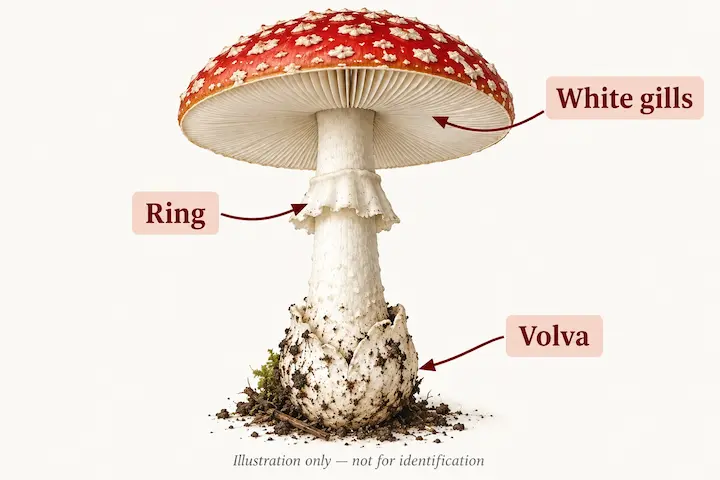 White gills, a ring, and a volva at the base. Know this combination and treat it as a stop sign.
A specimen with white gills, a ring, and a volva deserves your full respect. Do not eat it. Photograph it carefully and move on.
Step 4 — Make a Spore Print
Spore print color is one of the most reliable markers in mushroom identification, and making one costs nothing:
- Cut the cap off the stem.
- Place it gill-side down on paper — half on the white sheet, half on the dark one, so you can read pale and dark prints alike.
- Cover it with a bowl or cup to stop it drying out.
- Wait 4 to 24 hours.
- Lift the cap: you will find a deposit of spores, ranging from pure white through cream, yellow, pink, salmon, rust, chocolate brown, purple-brown, or black.
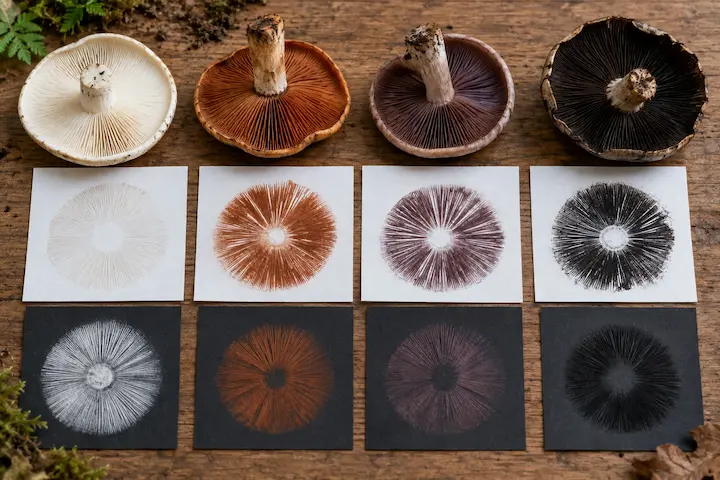 Four prints, four colours. Two mushrooms that look identical from above often separate cleanly here.
Write the color down next to your other notes. Two mushrooms that look nearly identical from above often separate cleanly here.
Step 5 — Note the Habitat, Growing Habit and Season
Where a mushroom grows is evidence, not background detail.
- Substrate — soil, leaf litter, dead wood, a living tree, or dung?
- Habit — solitary, scattered, in a cluster, or in a tight tuft?
- Neighbors — which trees were within a few meters? Many mushrooms form partnerships with specific trees, so knowing the tree narrows the list considerably.
- Season and weather — the date, recent rainfall and temperature all matter. The same woodland produces entirely different species in May and October.
- Location — if you are trying to identify mushrooms in your yard, note whether they appear in lawn, mulch beds, near a stump, or along a paved edge. Suburban habitats have their own predictable species.
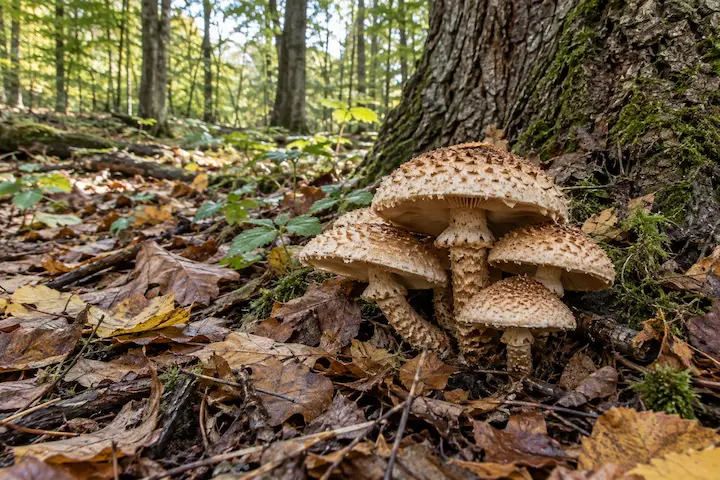 Note the trees within a few metres, not just the mushroom. Many species only grow with certain partners.
Step 6 — Record Smell, Bruising and Texture
Finish the specimen with your nose and your knife:
- Smell — some species smell of anise, almond, flour, cucumber, radish or turpentine; others are merely "fungoid." Smell never confirms an identification on its own, but a distinctive one is a strong clue.
- Bruising — scratch the cap, press the pores, or cut the stem and watch for the next few minutes. Many boletes stain blue almost instantly; others yellow, redden, or stay stubbornly the same.
- Texture and latex — does the flesh crumble, or is it tough and leathery? Cut a milkcap and see whether it bleeds white or orange liquid.
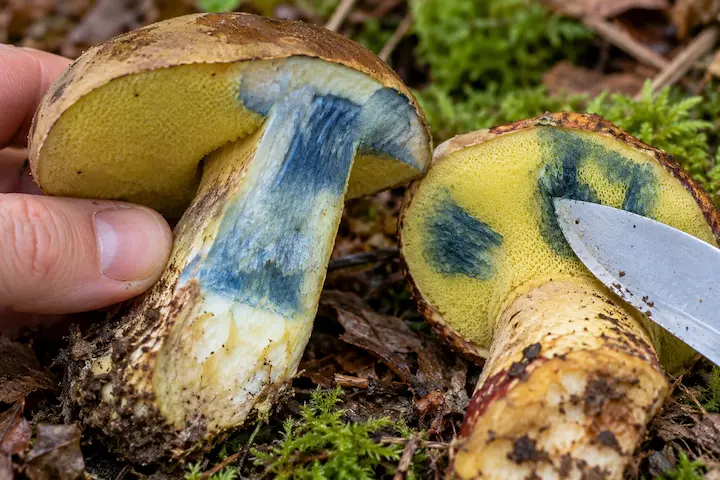 Bruising colour can appear within seconds and fade within minutes. Have your camera ready before you cut.
Step 7 — Cross-Check With More Than One Source
This is where an identification either holds up or falls apart.
- Use a regional field guide, not a general one. A guide written for the Pacific Northwest will send you badly wrong in New England.
- Check at least two sources — one guide, one local checklist, one trusted database.
- Look for what rules your candidate out, not just what matches. Confirm that every feature fits, including the ones you did not want to look at.
- Ask a human. Local mycological societies run forays, and their members enjoy helping with exactly this. A person holding the mushroom will always beat a photograph.
- For anything you plan to eat, get expert confirmation in person from someone qualified in your region. Mushrooms that are safely edible in one country often have dangerously similar relatives elsewhere.
How to Photograph a Mushroom So It Can Be Identified
If you want a photo-based identification to have any chance of being useful, take these five shots:
- Top-down of the cap, in focus, filling the frame
- Straight up at the underside, so the gills, pores or teeth are fully visible
- The full stem, from cap edge to base, in a single frame
- The base, exposed after digging it out cleanly — the shot most people forget
- A habitat shot, showing the substrate, nearby trees and how it was growing
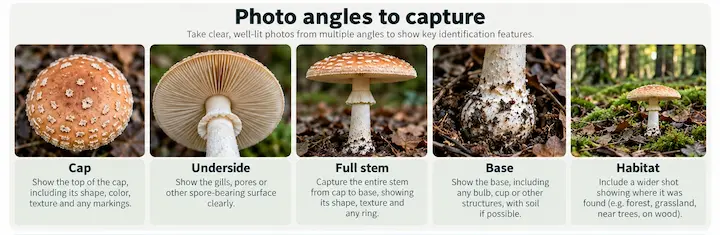 Five shots, five seconds each. Without the fourth one, most identifications stall.
Include a coin or a ruler for scale. Shoot in daylight, avoid harsh flash, and keep your fingers out of the frame. Five good photographs will outperform fifty careless ones.
Identifying Mushrooms by Picture vs. by Characteristics
There are two ways people look for an answer, and they call for slightly different approaches.
By picture is the fast route: you have an image and you want a starting suggestion. It works best when your photographs cover the features listed above, and it fails worst when you rely on it alone. Treat the result as a shortlist of candidates to check, never as a verdict.
By characteristics is the slow, reliable route: you build a description feature by feature — cap, underside, stem, base, spore print, habitat — and then match that description against a guide. It takes ten minutes, and it is the method that actually teaches you something.
The strongest approach is both. Get a fast photo-based suggestion to point you in the right direction, then confirm it characteristic by characteristic.
Mushroom Identification Checklist
| Feature | What to record |
|---|---|
| Cap | Shape, diameter (cm), color, surface, edge |
| Underside | Gills / pores / teeth / ridges; attachment, spacing, color |
| Stem | Shape, length, texture, solid or hollow |
| Ring | Present or absent; position; intact or lost |
| Base | Bulbous? Volva present? Dug out cleanly? |
| Flesh | Color, thickness, how it breaks |
| Bruising | Color change and how fast |
| Smell | Describe it; do not taste |
| Spore print | Color after 4–24 hours |
| Substrate | Soil / wood / dung / living tree |
| Habit | Solitary / scattered / clustered / tufted |
| Habitat | Trees nearby, date, weather, exact location |
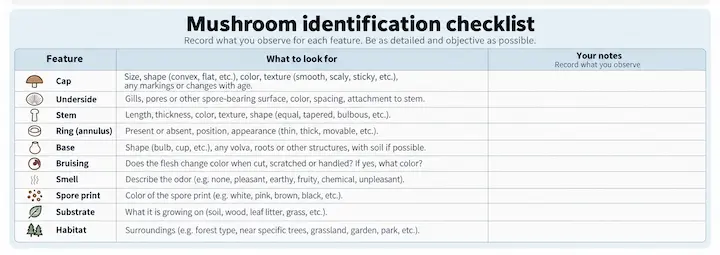 Print this and keep it in your basket — it is the fastest way to build the habit.
Common Beginner Mistakes
- Pulling instead of digging, and losing the volva
- Skipping the spore print because it takes overnight
- Trusting a single feature — "it has a ring, so it must be safe" is how people get hurt
- Assuming a familiar-looking mushroom from another country is the same species
- Treating an app's confidence score as a verdict
- Tasting anything
- Identifying from a photo taken at night or in flash — color balance is gone, and so is the answer
FAQ
Can I identify a mushroom by picture?
You can get a shortlist of candidates, not a confirmation. A photo cannot show the smell, the bruising reaction, the below-ground base, or the texture of the flesh — and those features decide most identifications. Use a picture to narrow the field, then work through the characteristics in the steps above to confirm it. If you plan to eat the mushroom, have a person who knows your region's fungi look at the actual specimen.
How do I identify mushrooms in my yard?
Start by noting where they appear: lawn, mulch bed, wood chips, near a stump, or along a paved edge. Then dig one out completely — base included — and work through the checklist. Species that fruit in lawns and mulch are a small, well-documented group, so a regional guide usually gets you to a confident answer quickly. Keep children and pets away from the patch until you know what it is.
Can I tell if a mushroom is safe by smell or taste?
No. Smell is a supporting clue at best, and taste is not a test you should ever run. Many deadly species smell pleasant and taste mild; the toxins that matter have no flavor at all. The only reliable way to know whether a mushroom is safe is to identify it correctly — with all the features recorded, cross-checked against more than one source.
Is it safe to eat a mushroom I identified myself?
Only if someone qualified in your region confirmed it on the actual specimen, or you are experienced enough to be that person. Beginner misidentifications are overwhelmingly "looks similar" errors, and the consequences are not proportional to how confident you feel. If you are new to foraging, enjoy the identification, photograph everything, and leave the eating to the people who have been doing this for years.
Ready to put the steps into practice? Upload a photo to our free mushroom identifier →